探究手机多媒体之————消息通知、拍照、相册选择,音频与视频播放
智能手机相较搭载塞班系统的按键手机,其最突出的特色就是对强大的多媒体功能的支持。随着网络技术的不断发展,手机对高质量图片、视频、以及音频的支持也变得愈发重要。
一、通知推送
《第一行代码》中,通过NotificationCompat的Builder构造器就能创建一个基本的Notification对象。但随着Android版本的深入,这种方法已经被摒弃 ,取而代之的是利用通知渠道Notification Channel进行统一管理通知,多个相同类别的通知(类别相同与否取决于开发者自己)可以共用 一个Channel。比如悬浮通知的Channel,我们可以选择将接收信息和接收视频通话这两种通知,通过悬浮通知的Channel进行推送。
通知渠道这一机制是在Android 8.0及其后开始作用的,其构造的基本参数有渠道Id(ChannelId)、渠道名称(ChannelName),以及渠道级别(Level)。前两者用意显而易见,通知级别是用来标识该通知在整个系统中通知顺序的先后的,越高的级别将越先被系统播放出来。
1.1 通知渠道的创建
笔者封装一个创建通知渠道的方法,根据渠道Id(ChannelId)、渠道名称(ChannelName),以及渠道级别(Level)来创建一个通知渠道的实例:
 1
 2
 3
 4
 5
 6
 7
 8
 9
10
11
12
13
14
15
16
17
18
19
20
private String CreateNotificationChannel ( String channelId , String channelName , int level ) {
if ( Build . VERSION . SDK_INT >= Build . VERSION_CODES . O ) {
// set ringtone
RingtoneManager ringtoneManager = new RingtoneManager ( this );
ringtoneManager . setType ( RingtoneManager . TYPE_NOTIFICATION );
Cursor cursor = ringtoneManager . getCursor ();
Uri soundUri = ringtoneManager . getRingtoneUri ( 2 );
channel = new NotificationChannel ( channelId , channelName , level );
// set notification sound
channel . setSound ( soundUri , Notification . AUDIO_ATTRIBUTES_DEFAULT );
// set vibration
channel . enableVibration ( true );
channel . setVibrationPattern ( new long [] { 0 , 300 , 600 , 400 , 600 , 300 });
notificationManager = ( NotificationManager ) getSystemService ( NOTIFICATION_SERVICE );
notificationManager . createNotificationChannel ( channel );
return channelId ;
} else {
return null ;
}
}
首先是判断当前系统版本是否大于Andorid 8.0,然后利用RingtoneManager获取系统中通知相关的铃声(TYPE_NOTIFICATION),从而得到某个通知铃声的内容URI,利用setSound()方法可以将该铃声应用到该通知渠道中;通过enableVibration()方法启用通知的震动效果,而setVibrationPattern()方法则是通过一个震动停歇相间隔的毫秒数组来控制马达的震动规律的,数组顺序依次是休眠、震动、休眠、震动 ……
最后通过getSystemService()方法可以返回一个NotificationManager实例,然后调用实例子方法createNotificationChannel(notificationChannel),即可完成notificationChannel的创建。
方法最终返回一个ChannelId,用于后续创建通知时选择通知渠道。
1.2 通知的创建
通过NotificationCompat的Builder构造器可以创建一个Notification实例,Notification类有以下子方法可以设置通知的属性:
 1
 2
 3
 4
 5
 6
 7
 8
 9
10
11
12
13
14
15
16
17
18
19
20
21
setContentTitle () // 设置通知内容标题
setContentText () // 设置通知内容文本
setWhen () // 设置通知出现的时间
setContentIntent () // 设置通知内容Intent
setSmallIcon () // 设置通知的小图标(通知栏小图标、通知栏内容左边图标)
setLargeIcon () // 设置通知的大图标(通知内容右边的大图标)
setAutoCancel () // 设置通知是否会自动消息
setOnGoing () // 设置通知是否常驻通知栏(无法水平滑动清除)
setPriority () // 设置通知出现的优先级
setStyle () // 设置通知样式
// 设置大文本(段落)
new NotificationCompat . BigTextStyle (). bigText ( myCharSequence )
// 设置通知显示图片
new NotificationCompat . BigPictureStyle (). bigPicture ( BitmapFactory . decodeResource ( getResources (), R . drawable . deborah_says ))
// 设置通知Intent
setContentIntent ( pendingIntent );
// 首先创建一个Intent实例、一个PendingIntent实例,
// 然后通过PendingIntent的getActivity()方法传入intent实例,
// Android 9以上还需在getActivity()方法中传入Flag。
在notificationManger和Notification实例初始化完成后,通过notificationManager.notify(id, notification.build())来完成通知的创建。
二、调用摄像头拍照
调用摄像头拍照,首先要解决的是存储空间写入权限问题,通过Environment.getExternalStorageState().equals(Environment.MEDIA_MOUNTED)判断外部空间写入权限状态。
通过创建ImageUri内容URI来指定相机保存图片的路径。主要步骤是先创建该路径下的img文件,然后通过FileProvider的getUriForFile()方法来初始化ImageUri,最后通过Intent来调用相机。
不过这里有个问题需要注意,startActivityForResult()在启动Intent后,会返回到之前的上下文,不过在Android 8.0之后,该方法已经被遗弃。取而代之的是ActivityResultLauncher,且调用方法略有出入 。
在调用ActivityResultLauncher之前,需通过registerForActivityResult()方法向其返回一个实例化对象,且须对参数列表中ActivityResultCallback对象的子方法onActivityResult()进行重写,当ActivityResult非空且结果状态正常时(RESULT_OK),才会执行回调函数体。
具体代码如下:
 1
 2
 3
 4
 5
 6
 7
 8
 9
10
11
12
13
14
15
16
17
18
19
20
21
22
23
24
25
26
27
28
29
30
31
32
33
34
35
36
37
38
39
40
41
42
43
44
45
activityResultLauncher = registerForActivityResult ( new ActivityResultContracts . StartActivityForResult (), new ActivityResultCallback < ActivityResult > () {
@Override
public void onActivityResult ( ActivityResult result ) {
if ( result . getData () != null && result . getResultCode () == Activity . RESULT_OK ) {
try {
Bitmap bitmap = BitmapFactory . decodeStream ( getContentResolver (). openInputStream ( imageUri ));
picture . setImageBitmap ( bitmap );
} catch ( FileNotFoundException e ) {
e . printStackTrace ();
}
}
}
);
if ( ! isExternalStorageWritable ()) {
Log . d ( "MainActivity" , "External Specified Folder unwritable!" );
}
File picPath = getAppSpecificAlbumStorageDir ( mContext );
Log . d ( "MainActivity" , "Picture Path: " + picPath . getPath ());
File externalCacheimg = new File ( picPath , "captured_image.jpg" );
try {
if ( externalCacheimg . exists ()) {
externalCacheimg . delete ();
}
externalCacheimg . createNewFile ();
} catch ( IOException e ) {
e . printStackTrace ();
}
if ( Build . VERSION . SDK_INT >= Build . VERSION_CODES . Q ) {
imageUri = FileProvider . getUriForFile ( MainActivity . this ,
"com.cosyspark.multimediatest.fileprovider" , externalCacheimg );
} else {
imageUri = Uri . fromFile ( externalCacheimg );
}
Intent intent1 = new Intent ( "android.media.action.IMAGE_CAPTURE" );
intent1 . putExtra ( MediaStore . EXTRA_OUTPUT , imageUri );
activityResultLauncher . launch ( intent1 );
File getAppSpecificAlbumStorageDir ( Context context ) {
File file = context . getExternalFilesDir ( Environment . DIRECTORY_PICTURES );
if ( file == null || ! file . mkdirs ()) {
Log . e ( "MainActivity" , "Album Directory not created" );
}
return file ;
}
对于FileProvider内容提供器的调用,还需在清单中进行声明:
1
2
3
4
5
6
7
8
9
<provider
android:name= "androidx.core.content.FileProvider"
android:authorities= "com.cosyspark.multimediatest.fileprovider"
android:exported= "false"
android:grantUriPermissions= "true" >
<meta-data
android:name= "android.support.FILE_PROVIDER_PATHS"
android:resource= "@xml/file_paths" />
</provider>
其中,meta-data指明了元数据的路径,这需要我们额外创建一个.xml文件进行说明:
1
2
3
4
5
6
<?xml version="1.0" encoding="UTF-8" ?>
<paths>
<external-files-path
name= "my_images"
path= "Pictures/" />
</paths>
这里external-files-path就是用来指定共享URI的路径 的,name标签随便填,path用来指定存储的子路径 。
补充 :
在当前活动布局设定为自动旋转时(默认),系统开启旋转后,旋转手机,当前活动将会进行重绘,即当前活动将被销毁 ,然后重建,以重新开始一个生命周期。那么将出现的问题是,刚刚通过ImageView显示出来的拍摄的照片将消失。
这种问题Android早已预料到,为此提出了savedInstanceState的概念,即每次活动的onCreate()方法伊始调用的super.onCreate(savedInstanceState)便体现在这。不过倘若我们不手动在活动结束前保存Bundle,那么在重新执行onCreate()前将不会载入之前活动的数据,因此,我们需重写onSaveInstanceState()方法:
1
2
3
4
5
@Override
protected void onSaveInstanceState ( Bundle outState ) {
outState . putParcelable ( "imageUri" , imageUri );
super . onSaveInstanceState ( outState );
}
三、从相册选取图片
这里的流程是通用的,需要注意的同样是startActivityForResult()方法的遗弃问题,这个上一目已经解决。那么我们直接上代码吧:
 1
 2
 3
 4
 5
 6
 7
 8
 9
10
11
12
13
14
15
16
17
18
19
20
21
22
23
24
25
26
27
28
29
30
31
32
33
34
35
36
37
38
39
40
41
42
43
44
45
46
47
48
49
50
public class MainActivity2 extends AppCompatActivity implements View . OnClickListener {
private ActivityResultLauncher < Intent > activityResultLauncher ;
private ImageView imageView ;
@Override
protected void onCreate ( Bundle savedInstanceState ) {
super . onCreate ( savedInstanceState );
setContentView ( R . layout . activity_main2 );
imageView = findViewById ( R . id . img_view );
Button btn_selectPhoto = findViewById ( R . id . btn_select_from_gallery );
btn_selectPhoto . setOnClickListener ( this );
activityResultLauncher = registerForActivityResult ( new ActivityResultContracts . StartActivityForResult (), new ActivityResultCallback < ActivityResult > () {
@Override
public void onActivityResult ( ActivityResult result ) {
if ( result . getResultCode () == Activity . RESULT_OK ) {
Intent data = result . getData ();
if ( data != null && data . getData () != null ) {
Uri selectedImageUri = data . getData ();
Bitmap selectedImageBitmap = null ;
try {
selectedImageBitmap = MediaStore . Images . Media . getBitmap ( getContentResolver (), selectedImageUri );
} catch ( IOException e ) {
e . printStackTrace ();
}
imageView . setImageBitmap ( selectedImageBitmap );
}
}
}
});
}
@Override
public void onClick ( View v ) {
switch ( v . getId ()) {
case R . id . btn_select_from_gallery :
Log . d ( "MainActivity2" , "btn_select_from_gallery clicked" );
Intent intent = new Intent ( Intent . ACTION_GET_CONTENT );
intent . setType ( "image/*" );
activityResultLauncher . launch ( intent );
break ;
default :
break ;
}
}
}
四、播放多媒体——音频
播放音频一般是通过MediaPlayer实现,它支持多种音频格式,主要控制方法如下:
MediaPlayer类的子方法
在创建MediaPlayer实例后,通过setDataSource()方法设置音频文件路径,然后需调用prepare()方法准备音频。
本例通过播放assets目录下的.m4a音频文件来介绍MediaPlayer的用法。
首先为获取asset目录中音频,需通过AssetManager的openFd()方法,传入音频文件在asset目录中的路径与名称,这将放回一个AssetFileDescriptor对象,最后利用该对象的getFileDescriptor()、getStartOffset()、getLength()获取三个参数传入setDataSource()方法的参数列表,即可完成asset目录中音频文件的初始化。
参考代码如下:
 1
 2
 3
 4
 5
 6
 7
 8
 9
10
11
12
13
14
15
16
17
18
19
20
21
22
23
24
25
26
27
28
29
30
31
32
33
34
35
36
37
38
39
40
41
42
43
44
45
46
47
48
49
50
51
52
53
54
55
56
57
58
59
60
61
62
63
64
65
66
67
68
69
70
71
72
73
74
assetFileDescriptor = assetManager . openFd ( "deborah's theme.m4a" );
mediaPlayer . setDataSource ( assetFileDescriptor . getFileDescriptor (), assetFileDescriptor . getStartOffset (), assetFileDescriptor . getLength ());
mediaPlayer . prepare ();
dTime = mediaPlayer . getDuration ();
duraTime = mill2time ( dTime );
txtTime . setText ( "00:00/" + duraTime );
music_prosBar . setProgress ( 0 );
对于MediaPlayer其他功能 , 没什么好讲的 , 直接看代码 :
myHandler = new Handler ();
myRunnable = new Runnable () {
@SuppressLint ( "SetTextI18n" )
@Override
public void run () {
int cur = mediaPlayer . getCurrentPosition ();
int curPos = ( int ) (( float ) cur / dTime * 1000 );
music_prosBar . setProgress ( curPos );
Log . d ( "MainActivity3" , "Progress:" + music_prosBar . getProgress ());
txtTime . setText ( mill2time ( cur ) + "/" + duraTime );
if ( 1000 - music_prosBar . getProgress () <= 5 ) {
Drawable drawable = getResources (). getDrawable ( R . drawable . btn_play );
btn_pp . setBackground ( drawable );
txtTime . setText ( "00:00/" + duraTime );
music_prosBar . setProgress ( 0 );
myThread . interrupt ();
}
}
};
public void onClick ( View v ) {
switch ( v . getId ()) {
case R . id . btn_pp :
updateBar ();
if ( mediaPlayer . isPlaying ()) {
mediaPlayer . pause ();
Drawable drawable = getResources (). getDrawable ( R . drawable . btn_play );
btn_pp . setBackground ( drawable );
} else {
mediaPlayer . start ();
Drawable drawable = getResources (). getDrawable ( R . drawable . btn_pause );
btn_pp . setBackground ( drawable );
}
break ;
case R . id . btn_forward :
mediaPlayer . seekTo ( mediaPlayer . getCurrentPosition () + 5000 );
break ;
case R . id . btn_rewind :
mediaPlayer . seekTo ( mediaPlayer . getCurrentPosition () - 5000 );
break ;
default :
break ;
}
}
private void updateBar () {
myThread = new Thread ( new Runnable () {
@Override
public void run () {
while ( true ) {
myHandler . post ( myRunnable );
try {
Thread . sleep ( 500 );
} catch ( InterruptedException e ) {
e . printStackTrace ();
}
}
}
});
myThread . start ();
}
private String mill2time ( long millisecond ) {
SimpleDateFormat dateFormat = new SimpleDateFormat ( "mm:ss" , Locale . CHINA );
dateFormat . setTimeZone ( TimeZone . getTimeZone ( "GMT+08:00" ));
return dateFormat . format ( new Date ( millisecond ));
}
五、播放多媒体——视频
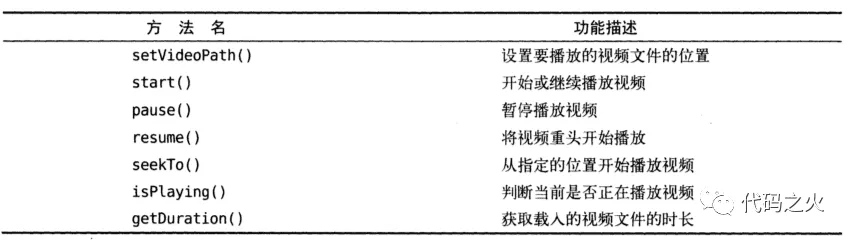
Android中视频的播放一般是通过VideoView来实现的,其基本框架与MediaPlayer类似:
VideoView类的子方法
不过如果要从apk包中读入视频文件,就不能通过常用的文件路径方法,而是要以raw文件的形式将video以内容URI的方式载入,这里用到VideoView的setVideoURI()方法:
1
2
String dir = "android.resource://" + getPackageName () + "/" + R . raw . mgws ;
videoView . setVideoURI ( Uri . parse ( dir ));
注意,这里raw文件的uri字符串需以"android.resource://"开头,追加包名,再以“/”分割,再追加raw文件id的形式构造。
VideoView的其他功能用法与MediaPlayer类似,具体参见代码:
 1
 2
 3
 4
 5
 6
 7
 8
 9
10
11
12
13
14
15
16
17
18
19
20
21
22
23
24
25
26
27
28
29
30
@Override
public void onClick ( View v ) {
switch ( v . getId ()) {
case R . id . btn_video_pp :
if ( videoView . isPlaying ()) {
videoView . pause ();
Drawable drawable = getResources (). getDrawable ( R . drawable . video_play
btn_video_pp . setBackground ( drawable );
} else {
videoView . start ();
Drawable drawable = getResources (). getDrawable ( R . drawable . video_paus
btn_video_pp . setBackground ( drawable );
}
break ;
case R . id . btn_video_forward_five :
videoView . seekTo ( videoView . getCurrentPosition () + 5000 );
break ;
case R . id . btn_video_forward_ten :
videoView . seekTo ( videoView . getCurrentPosition () + 10000 );
break ;
case R . id . btn_video_replay_five :
videoView . seekTo ( videoView . getCurrentPosition () - 5000 );
break ;
case R . id . btn_video_replay_ten :
videoView . seekTo ( videoView . getCurrentPosition () - 10000 );
break ;
default :
break ;
}
}
六、Demo
 Albresky's Blog

 支付宝
支付宝
 微信
微信
