Android开发之探究Fragment,总结常见问题
一、碎片的简介
碎片Fragment在表现形式上如同活动Activity的姊妹,但它的实际原理又与Activity颇为不同。Fragment扩展自android.app中的Object,而Activity继承于Context,Fragment拥有自己完整的生命周期,但是又依赖于Activity而存活。
碎片最大的特点是它可以作为页面中的一部分控件,而无需占据整个屏幕。因此,多个碎片布局在Activity中就好比一个页面同时存在多个Activity,从效果和作用上而言,碎片更像是一个活动中的子活动,能够彼此独立运行,各自拥有独立空间。打个比方,如果在一个页面中设置多个控件(不使用Fragment),那么就免不了布局的嵌套,而该页面又存活于同一个Activity,那么对各控件(子布局)的操纵将非常复杂。但使用Fragment时,就能让一个活动中存在多个类似活动的控件,彼此拥有独立的生命周期,同时还能逐个针对地进行调整。
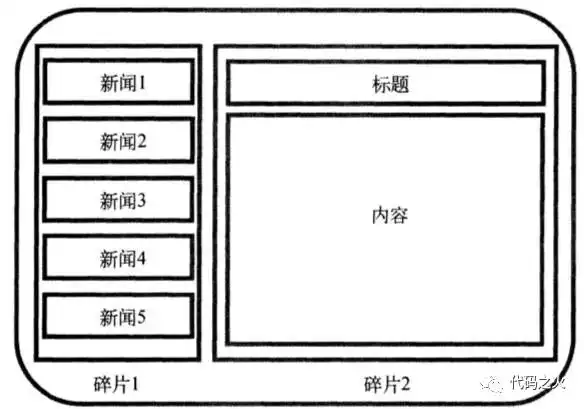
Fragment最为直观的例子就是平板设备的左右布局,即左边显示列表,右边显示内容,但在手机上运行时,右边布局又会被隐藏,其会作为一个新活动显示。
手机的设计方案
平板的双页设计
二、加载碎片
2.1 碎片基本用法
创建碎片的基本布局,同时为其创建一个继承于Fragment的类,重写onCreateView方法(创建布局)。之后便可在其他布局中添加fragment标签,同时指定name属性为上述自定义Fragment类的完整包路径,即可实现基本的碎片定义及创建。
定义左部布局:
 1
 2
 3
 4
 5
 6
 7
 8
 9
10
11
12
13
14
15
16
17
18
19
<LinearLayout xmlns:android= "http://schemas.android.com/apk/res/android"
android:layout_width= "match_parent"
android:layout_height= "match_parent"
android:orientation= "vertical" >
<Button
android:id= "@+id/btn_show_right_frag"
android:layout_width= "wrap_content"
android:layout_height= "wrap_content"
android:layout_gravity= "center_horizontal"
android:text= "Show right fragment" />
<Button
android:id= "@+id/btn_hide_right_frag"
android:layout_width= "wrap_content"
android:layout_height= "wrap_content"
android:layout_gravity= "center_horizontal"
android:text= "hide right fragment" />
</LinearLayout>
定义右部布局:
 1
 2
 3
 4
 5
 6
 7
 8
 9
10
11
12
13
<LinearLayout xmlns:android= "http://schemas.android.com/apk/res/android"
android:layout_width= "match_parent"
android:layout_height= "match_parent"
android:background= "#00ff00"
android:orientation= "vertical" >
<TextView
android:layout_width= "wrap_content"
android:layout_height= "wrap_content"
android:layout_gravity= "center_horizontal"
android:text= "This is a right fragment"
android:textSize= "24sp" />
</LinearLayout>
为布局定义类:
 1
 2
 3
 4
 5
 6
 7
 8
 9
10
11
12
13
14
15
16
17
18
19
// leftFragment.class
public class LeftFragment extends Fragment {
@Override
public View onCreateView ( @NonNull LayoutInflater inflater , @Nullable ViewGroup container , @Nullable Bundle savedInstanceState ) {
View view = inflater . inflate ( R . layout . left_fragment , container , false );
return view ;
}
}
// rightFragment.class
public class RightFragment extends Fragment {
@Override
public View onCreateView ( @NonNull LayoutInflater inflater , @Nullable ViewGroup container , @Nullable Bundle savedInstanceState ) {
View view = inflater . inflate ( R . layout . right_fragment , container , false );
return view ;
}
}
activity_main.xml定义如下:
 1
 2
 3
 4
 5
 6
 7
 8
 9
10
11
12
13
14
15
16
17
18
<LinearLayout xmlns:android= "http://schemas.android.com/apk/res/android"
android:layout_width= "match_parent"
android:layout_height= "match_parent"
android:orientation= "horizontal" >
<androidx.fragment.app.FragmentContainerView
android:id= "@+id/left_fragment"
android:name= "com.cosyspark.fragmentexample.LeftFragment"
android:layout_width= "0dp"
android:layout_height= "match_parent"
android:layout_weight= "1" />
<FrameLayout
android:id= "@+id/another_right_fragmentLayout"
android:layout_width= "0dp"
android:layout_height= "match_parent"
android:layout_weight= "1" />
</LinearLayout>
2.2 动态加载碎片
动态加载布局主要利用FragmentManager碎片管理器,通过获取当前的碎片管理器,调用beginTransaction()方法,通过replace()方法向容器内添加或替换碎片,传入布局id和碎片实例,最后调用commit()提交事务。
关键代码如下:
 1
 2
 3
 4
 5
 6
 7
 8
 9
10
11
12
13
14
15
16
@Override
public void onClick ( View v ) {
switch ( v . getId ()) {
case R . id . btn_show_right_frag :
replaceFragment ( new AnotherRightFragment ());
break ;
}
}
private void replaceFragment ( Fragment fragment ) {
FragmentManager fragmentManager = getSupportFragmentManager ();
FragmentTransaction transaction = fragmentManager . beginTransaction ();
transaction . replace ( R . id . another_right_fragmentLayout , fragment );
transaction . addToBackStack ( null );
transaction . commit ();
}
通过在事物提交前添加addToBackStack(null)方法,即可模拟返回栈,此时点击返回会撤销最新加载的碎片。其中,参数用于描述返回栈的状态,可为空。
2.3 碎片与活动间的通信
为了方便碎片和活动间进行通信,FragmentManager提供了一个类似findViewById()的方法,用于从布局id获取对应碎片的实例:
1
RightFragment rightFragment = ( RightFragment ) getFragmentManager (). findViewById ( R . id . right_fragment );)
上述方法告诉我们可以通过findViewById()方法在活动中获取碎片的实例,那么如何在碎片中获取活动的实例呢?这个更加简单,只需调用getActivity()方法即可:
1
CosySparkActivity activity = ( CosySparkActivity ) getActivity ();
三、碎片的生命周期
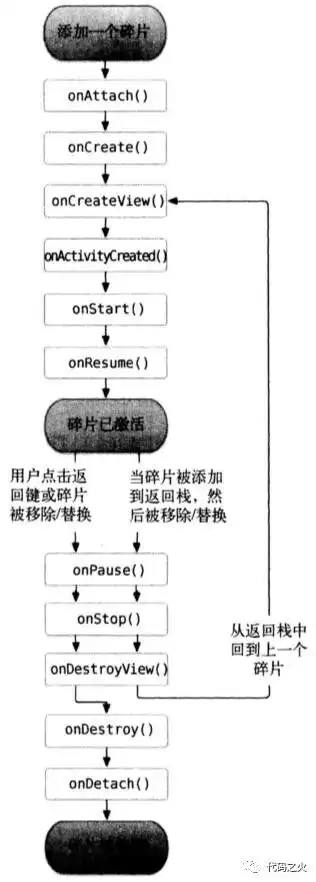
碎片的生命周期
碎片的生命周期与活动相同,一样也存在的四个状态:运行、暂停、停止、销毁状态。
在调用之前提及的addToBackStack()方法后,碎片会进入停止状态。进入停止状态的碎片将对用户不可见,其内存有可能会被系统回收。
此外,碎片又多了一些附加的回调方法:
onAttach() 碎片与活动建立关联时
onCreateView() 碎片加载布局时
onActivityCreated() 与碎片关联的活动都创建完毕时
onDestroyView() 与碎片相关的视图被移除时
onDetach() 碎片与活动解除关联时
四、动态加载布局的技巧
4.1 限定符
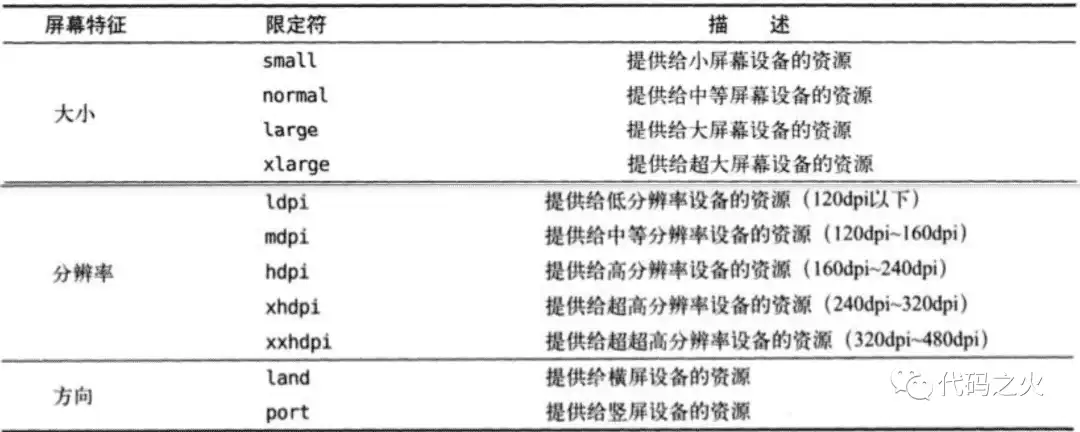
利用安卓SDK内置的限定符特性,我们可以针对不同屏幕尺寸的设备,为同一个页面创建适合的控件布局,即将各自的.xml创建在layout、layout-small、layout-xlarge、layout-sw600dp(最小宽度限定符)等资源文件夹(/res/)中,且布局标签的id保持一致,系统会根据屏幕尺寸进行选择。
Android中常见的限定符如下:
安卓SDK内置的限定符
五、问题总结
在写书中的新闻应用时,遇到一些issues,总结一下。
首先 是androidx和android.support依赖库的混用问题。
由于安卓9之后,谷歌重整了传统的android.support依赖库,提出了一个新的依赖库——androidx,它综合了诸如RecycleView和fragment等组件库。在项目中如果有传统依赖库和androidx库混用的情况,需在项目文件夹下的gradle.properties中添加:
1
android.enableJetifier=true
其次,对于一个项目中的同一组件,最好同一其库依赖,不要在不同的class文件中导入不同的依赖库依赖,如以下颇具隐患的导入方式:
1
2
3
4
5
6
7
8
9
// left_fragment.class
import android.support.v4.app.fragment
···
···

// myAdapter.class
import androidx.fragment.app.Fragment
···
···
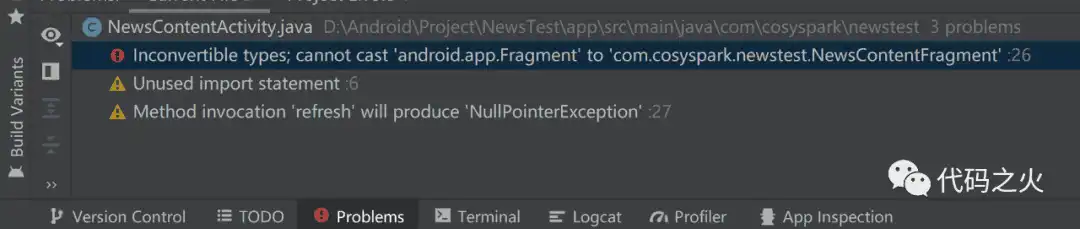
上述导入方式将会导致以下问题(error部分):
Error部分
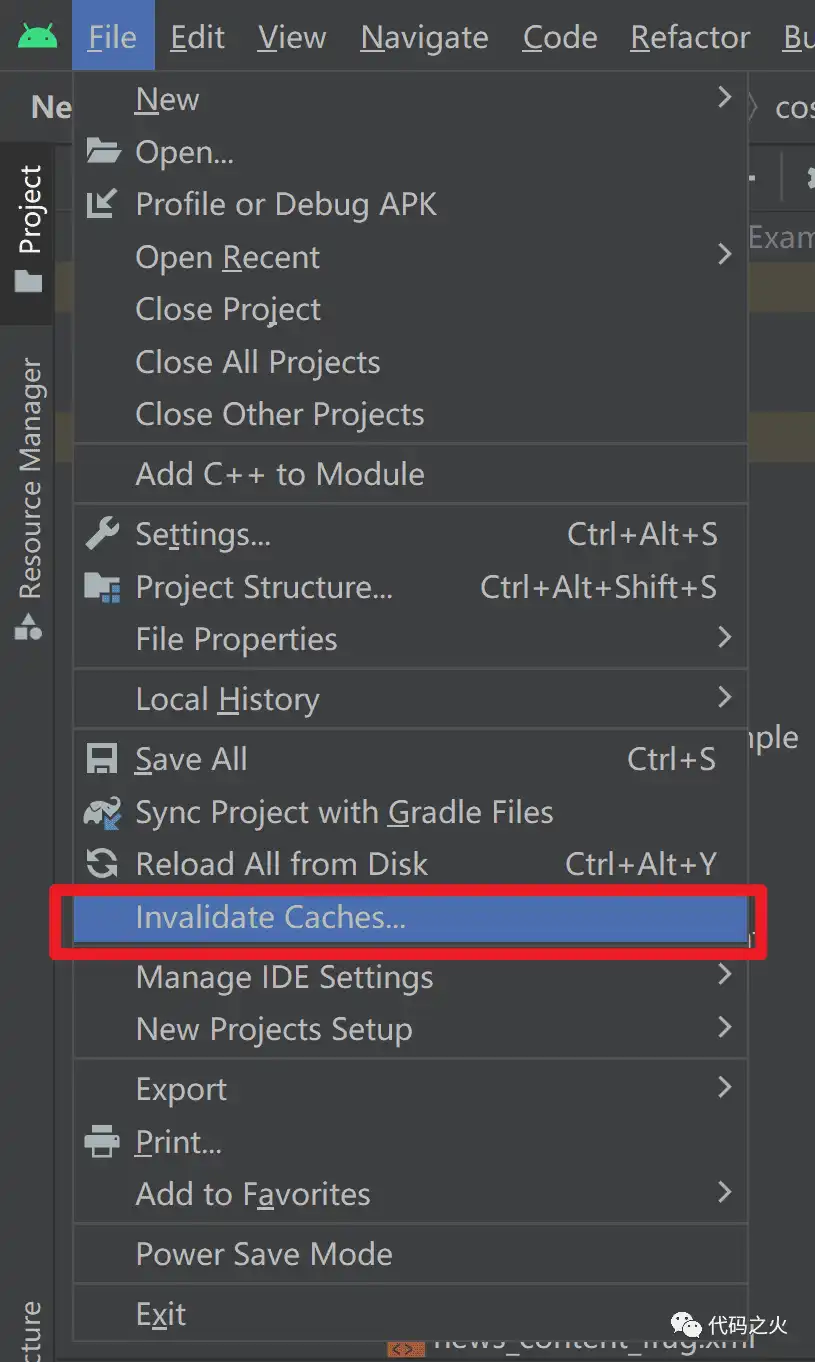
另外 ,如果项目出现project error(99+),通常是因为更新了gradle,但缓存未清除导致ide索引时未同步更新,进而造成的命名空间、关键字等的识别异常及丢失问题。此时,可以尝试清除项目缓存:
解决方案
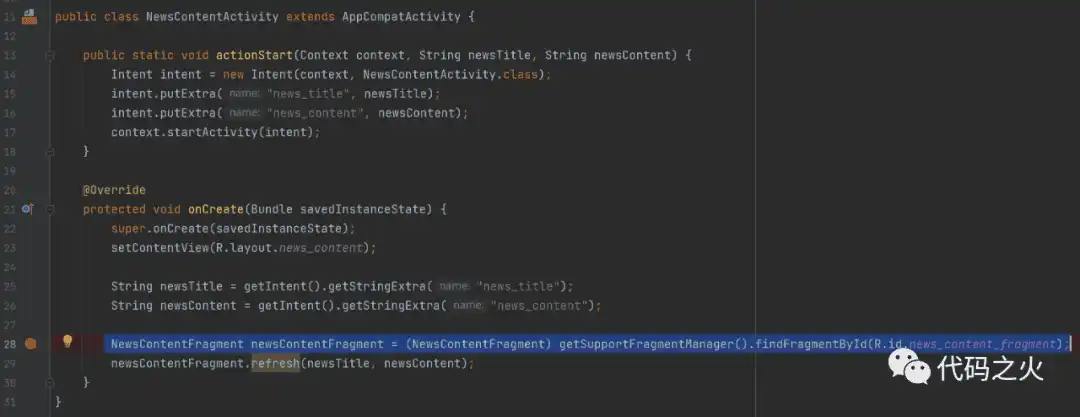
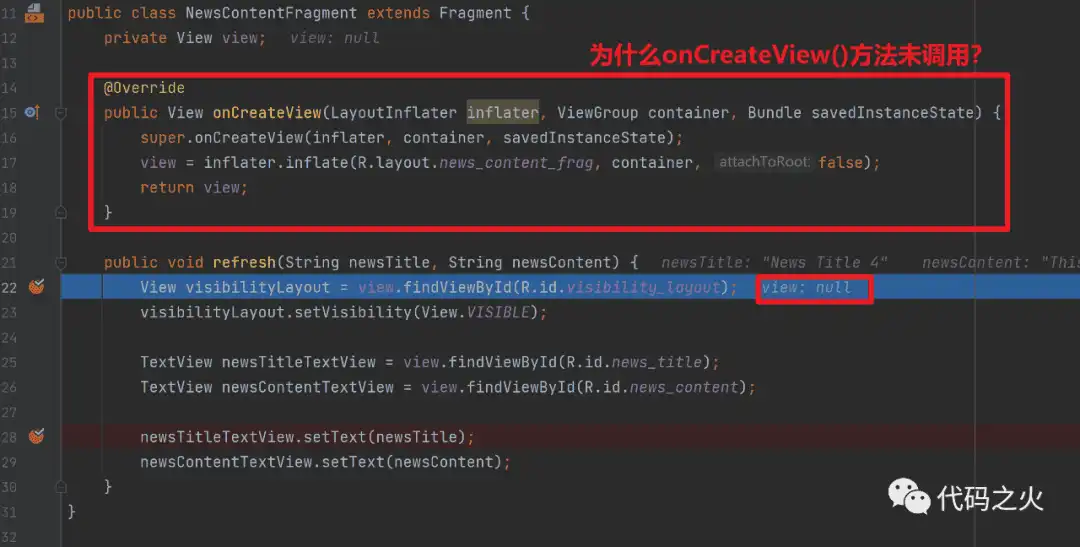
最后 ,记录一下目前无法解决的问题:fragment创建时跳过了加载布局的回调方法(未知缘由),导致激发创建该fragment的触发器时,app会闪退。目前debug得到的部分原因是,fragment的onCreateView()回调方法会对私有成员对象view进行实例化,但是在debug时分析得知该回调方法并未被调用,导致view自始至终为null,进一步致使调用refresh()方法时,操作了空对象view,触发异常,app闪退。至于为什么onCreateView()回调方法未被调用,未找到原因,等某天找到问题所在时,笔者将发文总结。
未解决的疑问
未解决的疑问
未解决的疑问
 Albresky's Blog
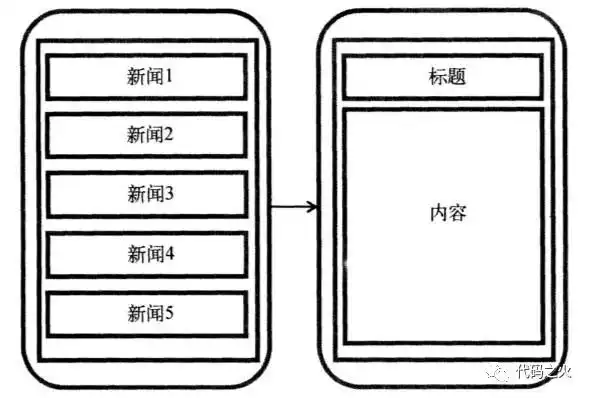

 支付宝
支付宝
 微信
微信
